Water Damage Ceiling
Effective Solutions for Water Damage Ceiling Repair
Water Damage Ceiling
Homeowners fear ceiling water damage for its structural, cosmetic, and health effects. You’ll learn practical water damage ceiling repair methods in this detailed tutorial.
Assessing the Extent of the Damage
Assess the damage to your water-damaged ceiling before restoring it. Water damage can cause fading, sagging, mold, and mildew. Start by recognizing these indications and assessing the damage. This assessment will guide your repair and explain the extent of the work.Begin by inspecting the area carefully for any visible signs of water damage. Look for water stains, peeling paint or wallpaper, and any holes in the ceiling. Use a flashlight to check for mold and mildew growth, as it can thrive in damp environments.
Locate and Fix the Source of the Water Intrusion
To prevent further damage, you must identify and address the source of the leak. Common sources include roof leaks, plumbing issues, and clogged gutters. Once you’ve pinpointed the problem, take immediate action to fix it. For complex issues, consider hiring a professional to ensure a proper and lasting solution.Check for roof leaks and get a local roofing specialist to fix them. Check that the roofing installation fulfills local business bureau criteria. Contracts with certified and insured specialists offer peace of mind and high-quality work.
Safety First: Protecting Yourself and Your Property
When dealing with water damage ceiling repair, safety should always be a top priority. Ensure the safety of your family members and yourself by taking the following precautions:
- If the water damage ceiling is extensive or poses safety concerns, evacuate your home. Safety should always come first, and it’s essential to follow your home fire escape plan if necessary.
- Install smoke alarms and carbon monoxide detectors in your home, and test them regularly. Be sure to practice your home fire escape plan and have escape ladders on hand for safely escaping higher floors.
- Familiarize yourself with your home’s floor plan and escape routes. In case of an emergency, knowing how to safely exit your home can be crucial. Remove security bars from windows that could hinder your escape.
Beginning the Repair Process
Once you’ve ensured safety and addressed the source of the water intrusion, it’s time to start repairing your water-damaged ceiling. Here are the steps to follow:
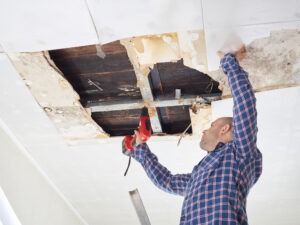
- 1. Remove Damaged Material
Begin by carefully removing any damaged ceiling material. This may include wet drywall, insulation, or ceiling tiles. Be cautious while doing this, as wet materials can be heavy and may collapse if not handled properly. Use appropriate safety gear, such as gloves and goggles, to protect yourself during this process.
- Water Damage Ceiling Material
- 2. Ensure the Area is Completely Dry
After removing the damaged material, it’s essential to ensure that the affected area is completely dry. Use fans and extractors to expedite the drying process. Small holes in the ceiling can aid in ventilation and drying.
- Completely Dry
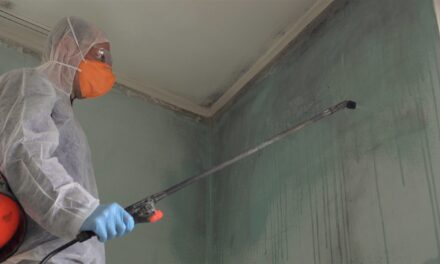
- 3. Treat for Mold and Mildew
If you find mold and mildew during your inspection, fix it immediately. Remove mold and mildew carefully to avoid health issues. Use mold-killing cleaners and protective gear to clean and disinfect affected areas.
- Mold and Mildew
- 4. Repairing the Ceiling
Once the area is dry and free from mold and mildew, you can proceed with repairing the ceiling. This may involve patching and painting, installing new drywall, or replacing ceiling tiles. Ensure that the repaired area blends seamlessly with the rest of the ceiling.
- Repairing the Ceiling
- 5. Preventing Future Water Damage
After restoring your ceiling to its former glory, it’s essential to take steps to prevent future water damage. Here are some tips to help you safeguard your home:
1. Regular Maintenance and Local Roof Business
Check these places for leaks, fractures, and obstructions that might let water in. Your local roof business bureau can supply references for competent roofing installation providers. Contracting with certified and insured contractors gives peace of mind. Local Roof Business, Signing Contracts, List of References, Licensed and Insured, Peace of Mind
2. Proper Insulation and Ventilation
Proper insulation can help regulate the temperature and moisture levels in your home. It can also prevent condensation, which can contribute to water damage. Consult with an insulation expert to ensure your home has the right type and amount of insulation. Maintain good ventilation, especially in areas prone to humidity, such as bathrooms and kitchens.
Proper Insulation, Good Ventilation
3. Regular Monitoring for Leaks
Keep an eye out for any signs of leaks or water damage in your home. Act quickly if you notice any issues, as early intervention can prevent extensive damage. Consult the Yellow Pages for local professionals who specialize in addressing leaks and water damage.
Monitoring for Leaks, Yellow Pages
Conclusion
Water damage to your ceiling can be a challenging situation to deal with, but with the right approach and professional assistance, you can effectively repair and restore your home. Remember to prioritize safety, assess the damage, address the source of the water intrusion, and follow the repair steps outlined in this guide. By taking these actions and implementing preventive measures, you can safeguard your property from future water damage.
As a top fire restoration company, we specialize in restoring homes damaged by water, fire, and other disasters. Contact us at 800.298.0900 for expert assistance in repairing and restoring your property.


