Water Damage Ceiling repair
Water damage ceiling can be a distressing situation for any homeowner. If a pipe bursts, roof leaks, or appliance breaks, it can cause significant issues if not fixed promptly. This guide will show you quick ways to repair a water-damaged ceiling. The goal is to maintain the safety and strength of your property.
Water Damage Ceiling repair
Understanding Water Damage Ceiling repair
Before fixing it, it’s important to understand what causes water damage ceiling. When moisture seeps into the ceiling, it can precipitate a range of issues, encompassing but not limited to:- Staining
- Peeling paint or wallpaper
- Softening of drywall or plaster
- Mold and mildew growth
Assessing the Damage
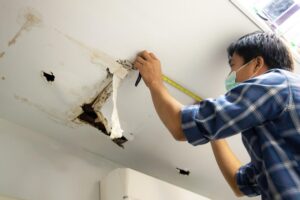
Water damage can vary in severity, ranging from minor leaks to significant flooding. Assessing the extent of the damage is crucial before proceeding with restoration efforts. Here’s how to do it:- Inspect the affected area thoroughly, looking for signs of water stains, sagging, or discoloration.
- Probe the damaged area gently to check for soft spots or crumbling drywall.
- Look for any signs of mold or mildew growth, which indicate prolonged moisture exposure.
Quick Solutions for Restoration
Once you’ve assessed the damage, it’s time to take swift action to restore your water-damaged ceiling. Here are some quick solutions:1: Identify and Stop the Source of Water
The first step in addressing water damage is to identify and stop the source of water intrusion. If there is a leak from a pipe, roof, or appliance, turning off the water can stop more damage from happening.2: Remove Standing Water
Standing water can exacerbate the damage and promote mold growth. Use a wet vacuum or mop to remove any standing water from the affected area promptly.3: Dry Out the Area
Thoroughly drying out the water-damaged area is essential to prevent mold growth and further decline. Use fans, Air quality, or natural ventilation to expedite the drying process.4: Repair or Replace Damaged Materials
If the damage is bad, you might have to fix or change things like drywall, insulation, or ceiling tiles. Cut out any water-damaged portions and replace them with new materials to ensure structural integrity.5: Address Mold and Mildew
If mold or mildew has started growing on the ceiling, it’s crucial to address it promptly. Clean mold with water and detergent or hire pros for thorough mold removal.6: Restore the Ceiling
Once the area is thoroughly dry and free of mold, you can proceed with restoring the ceiling to its pre-damaged condition. This may involve repainting, retexturing, or applying new wallpaper, depending on the extent of the damage.Preventing Future Water Damage
Using proactive steps to stop water damage is important for keeping your home safe and strong. Here are some tips to minimize the risk of water damage to your ceiling:- Frequently inspect plumbing fixtures and appliances for leaks or signs of wear and tear.
- Keep gutters and downspouts clean and free of debris to prevent water from backing up and seeping into the roof.
- Ensure proper ventilation in bathrooms, kitchens, and other moisture-prone areas to prevent condensation and mold growth.
- Keep warm pipes in unheated areas to prevent them from freezing and bursting during cold weather.
- Install a water leak detection system to warn you of leaks before they cause damage.


